
Transcription, or speech-to-text (STT), is a very helpful feature for various use cases, from AI assistants to video captioning. You can use it to create immersive virtual experiences and accessible interfaces unlike ever before. It’s no wonder STT-driven apps and services are in high demand.
In this article, you’ll learn how to implement STT functionality in your own app with ease using AssemblyAI. Its API provides simple access to advanced AI models that can transcribe your audio or video files and even real-time streams.
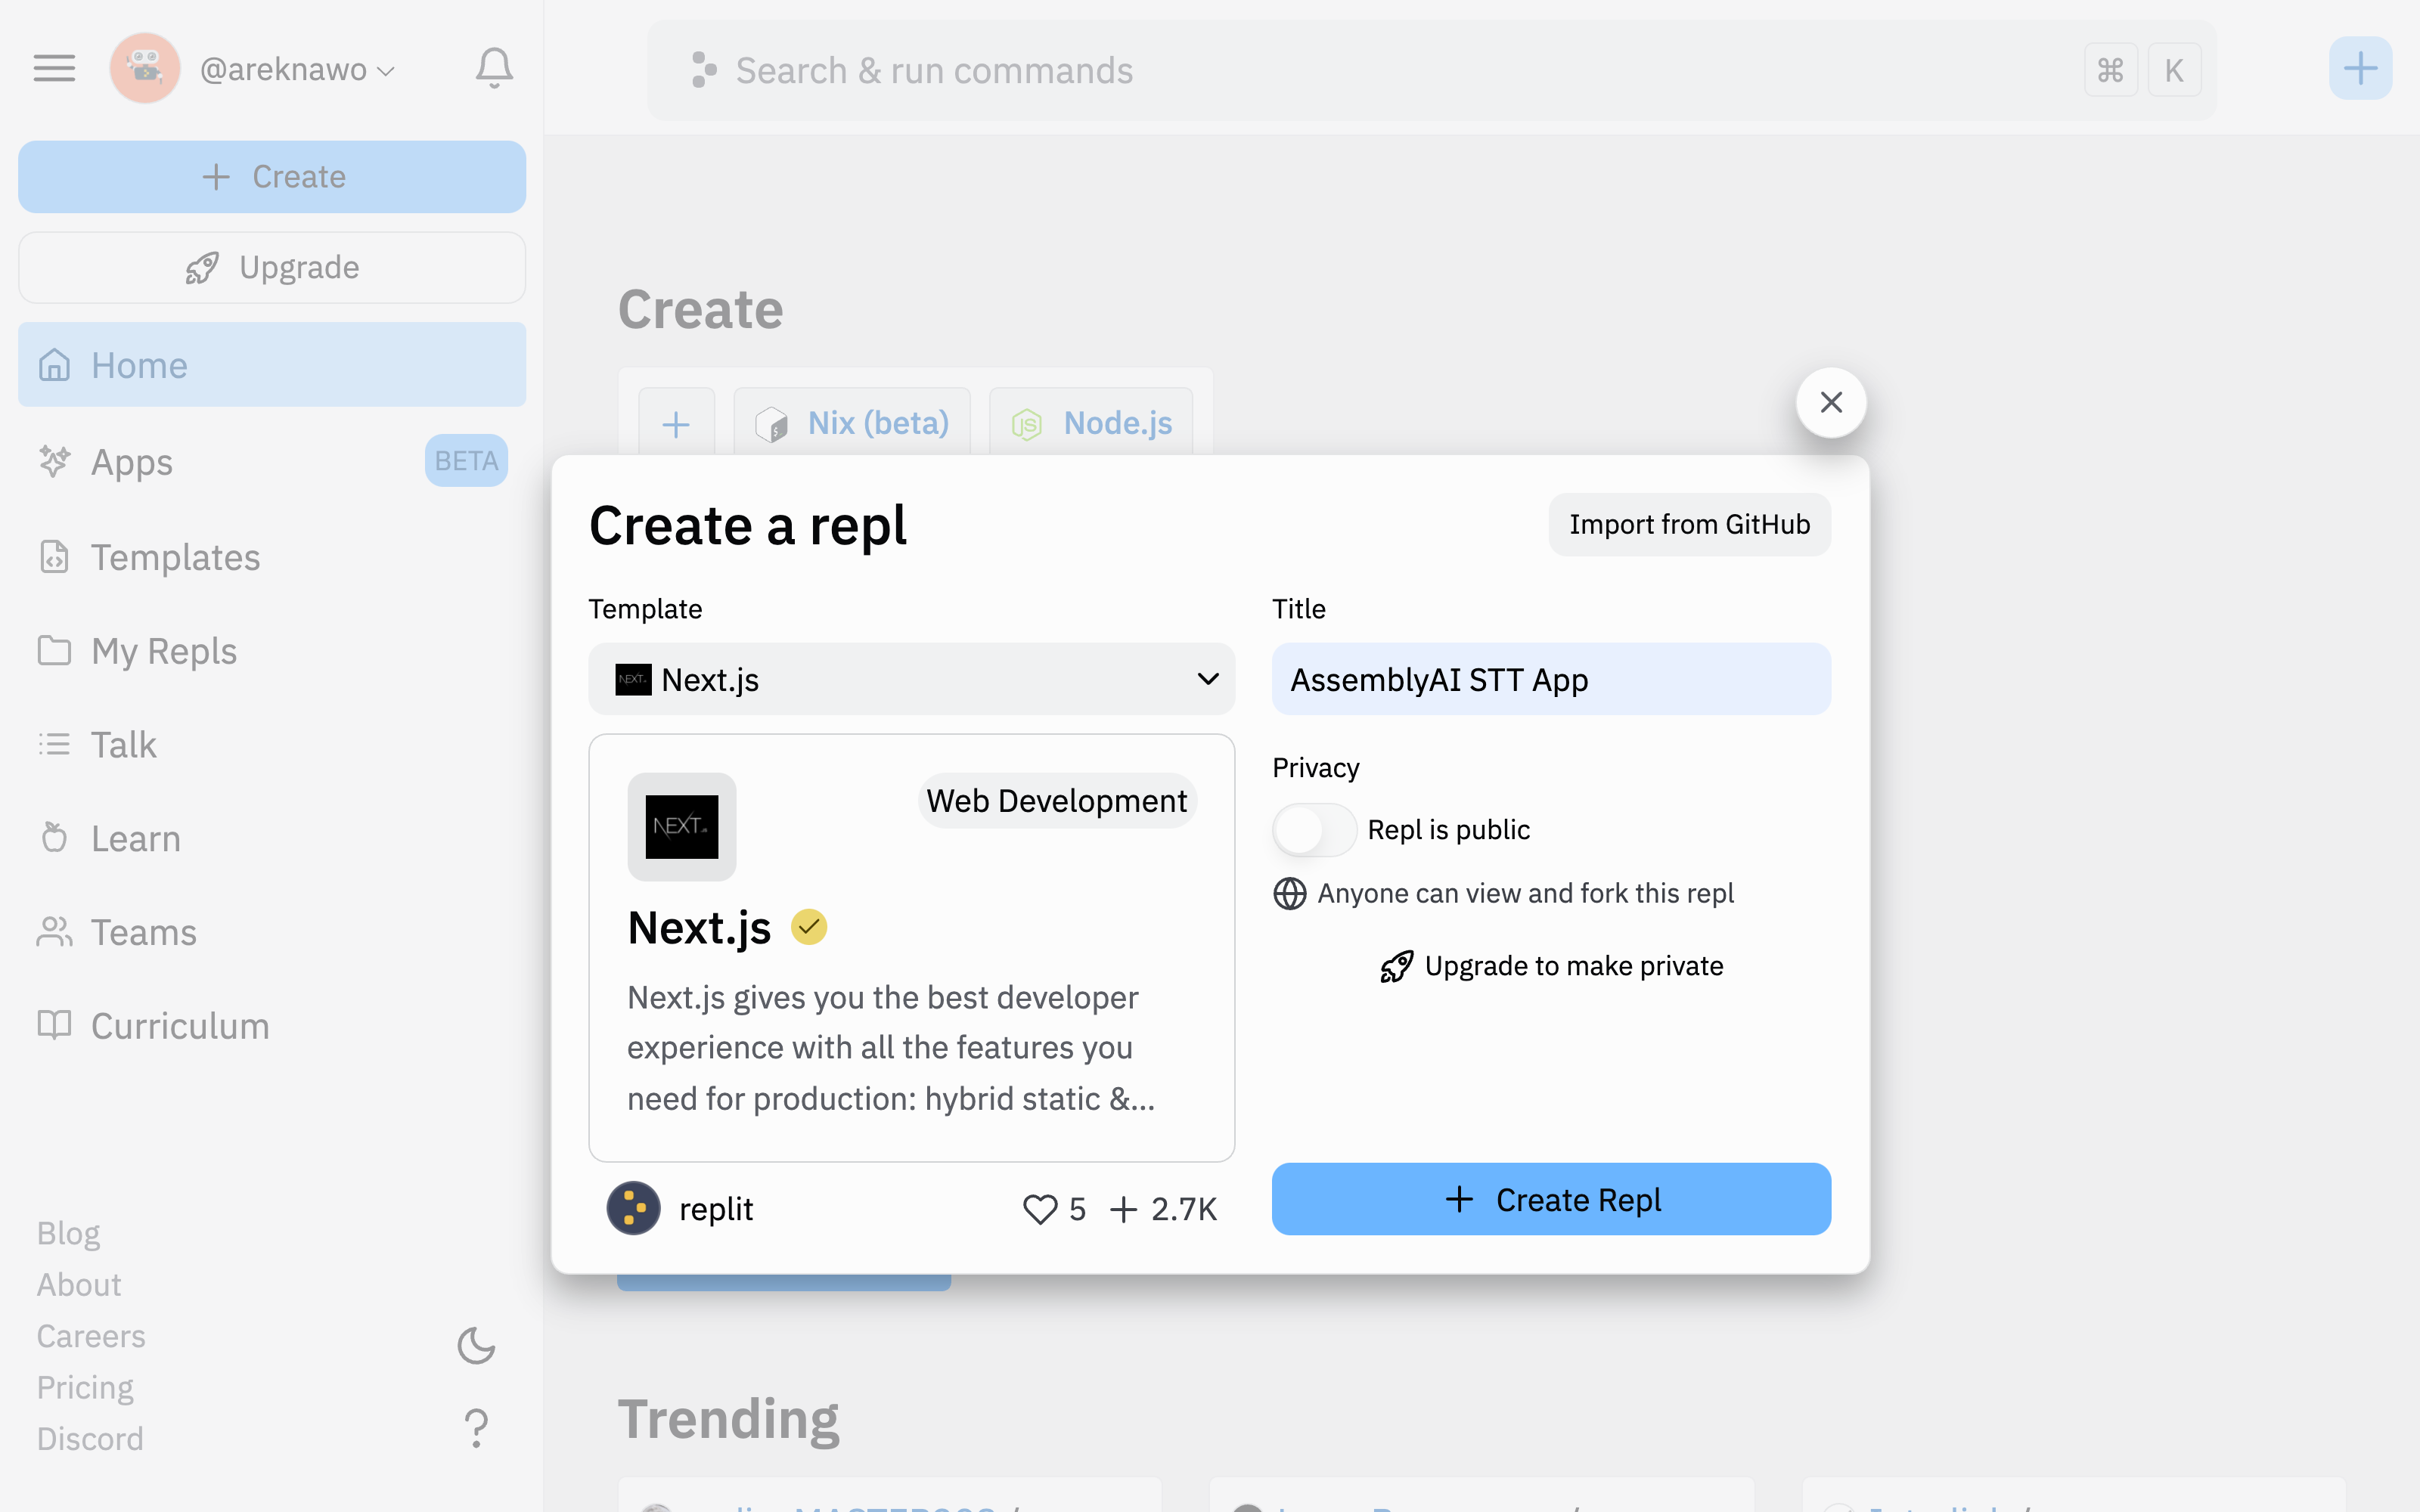
You’ll use AssemblyAI together with React, Next.js, and Replit to build a simple app for transcribing uploaded files. You can follow along with the repl here.
What Is AssemblyAI
Before diving in, take a moment to get to know AssemblyAI and its vast feature set.
On top of both real-time and async transcription, AssemblyAI API provides many features related to general audio intelligence:
- Automatic speakers detection and differentiation
- Intelligent punctuation and content summarization
- Support for custom/niche vocabulary
- Sensitive content moderation
- Detection of topic and entities, like company names or locations in the audio
All the above is already possible with AssemblyAI, and upcoming features like translation and emotion detection will only unlock more potential.
Again, there’s a lot you can do with AssemblyAI. Examples include captioning videos, transcribing phone calls, or moderating sensitive content. With AssemblyAI, the sky’s the limit.
Implementing a Speech-to-Text App with AssemblyAI
Now, without further ado, get started in building your STT app by creating a new Next.js repl.
Use your repl’s shell to install the dependencies and initialize Tailwind:
npm install -D tailwindcss postcss autoprefixer
npm install axios clsx multiparty
npx tailwindcss init -p
The dependencies installed with this command include the following:
- Tailwind and PostCSS to use utility-first CSS in the frontend
- clsx for operating CSS class strings
- Axios as an isomorphic HTTP client for the frontend and backend (Next.js API routes)
- multiparty to parse
multipart/form-datarequest contents used in file uploads
To finish setting up Tailwind, you’ll need to edit a few files. Start with tailwind.config.js:
module.exports = {
  content: [
    "./pages/**/*.{js,ts,jsx,tsx}",
    "./components/**/*.{js,ts,jsx,tsx}",
  ],
  theme: {
    extend: {},
  },
};
Next, inside styles/globals.css, add the necessary @tailwind directives:
@tailwind base;
@tailwind components;
@tailwind utilities;
Finally, make sure styles/globals.css is imported from inside pages/\_app.js:
import "../styles/globals.css";

const MyApp = ({ Component, pageProps }) => {
  return <Component {...pageProps} />;
};

export default MyApp;
Connecting with AssemblyAI
To connect with AssemblyAI, you’ll create three separate Next.js API routes, each responsible for a different part of the transcription process.
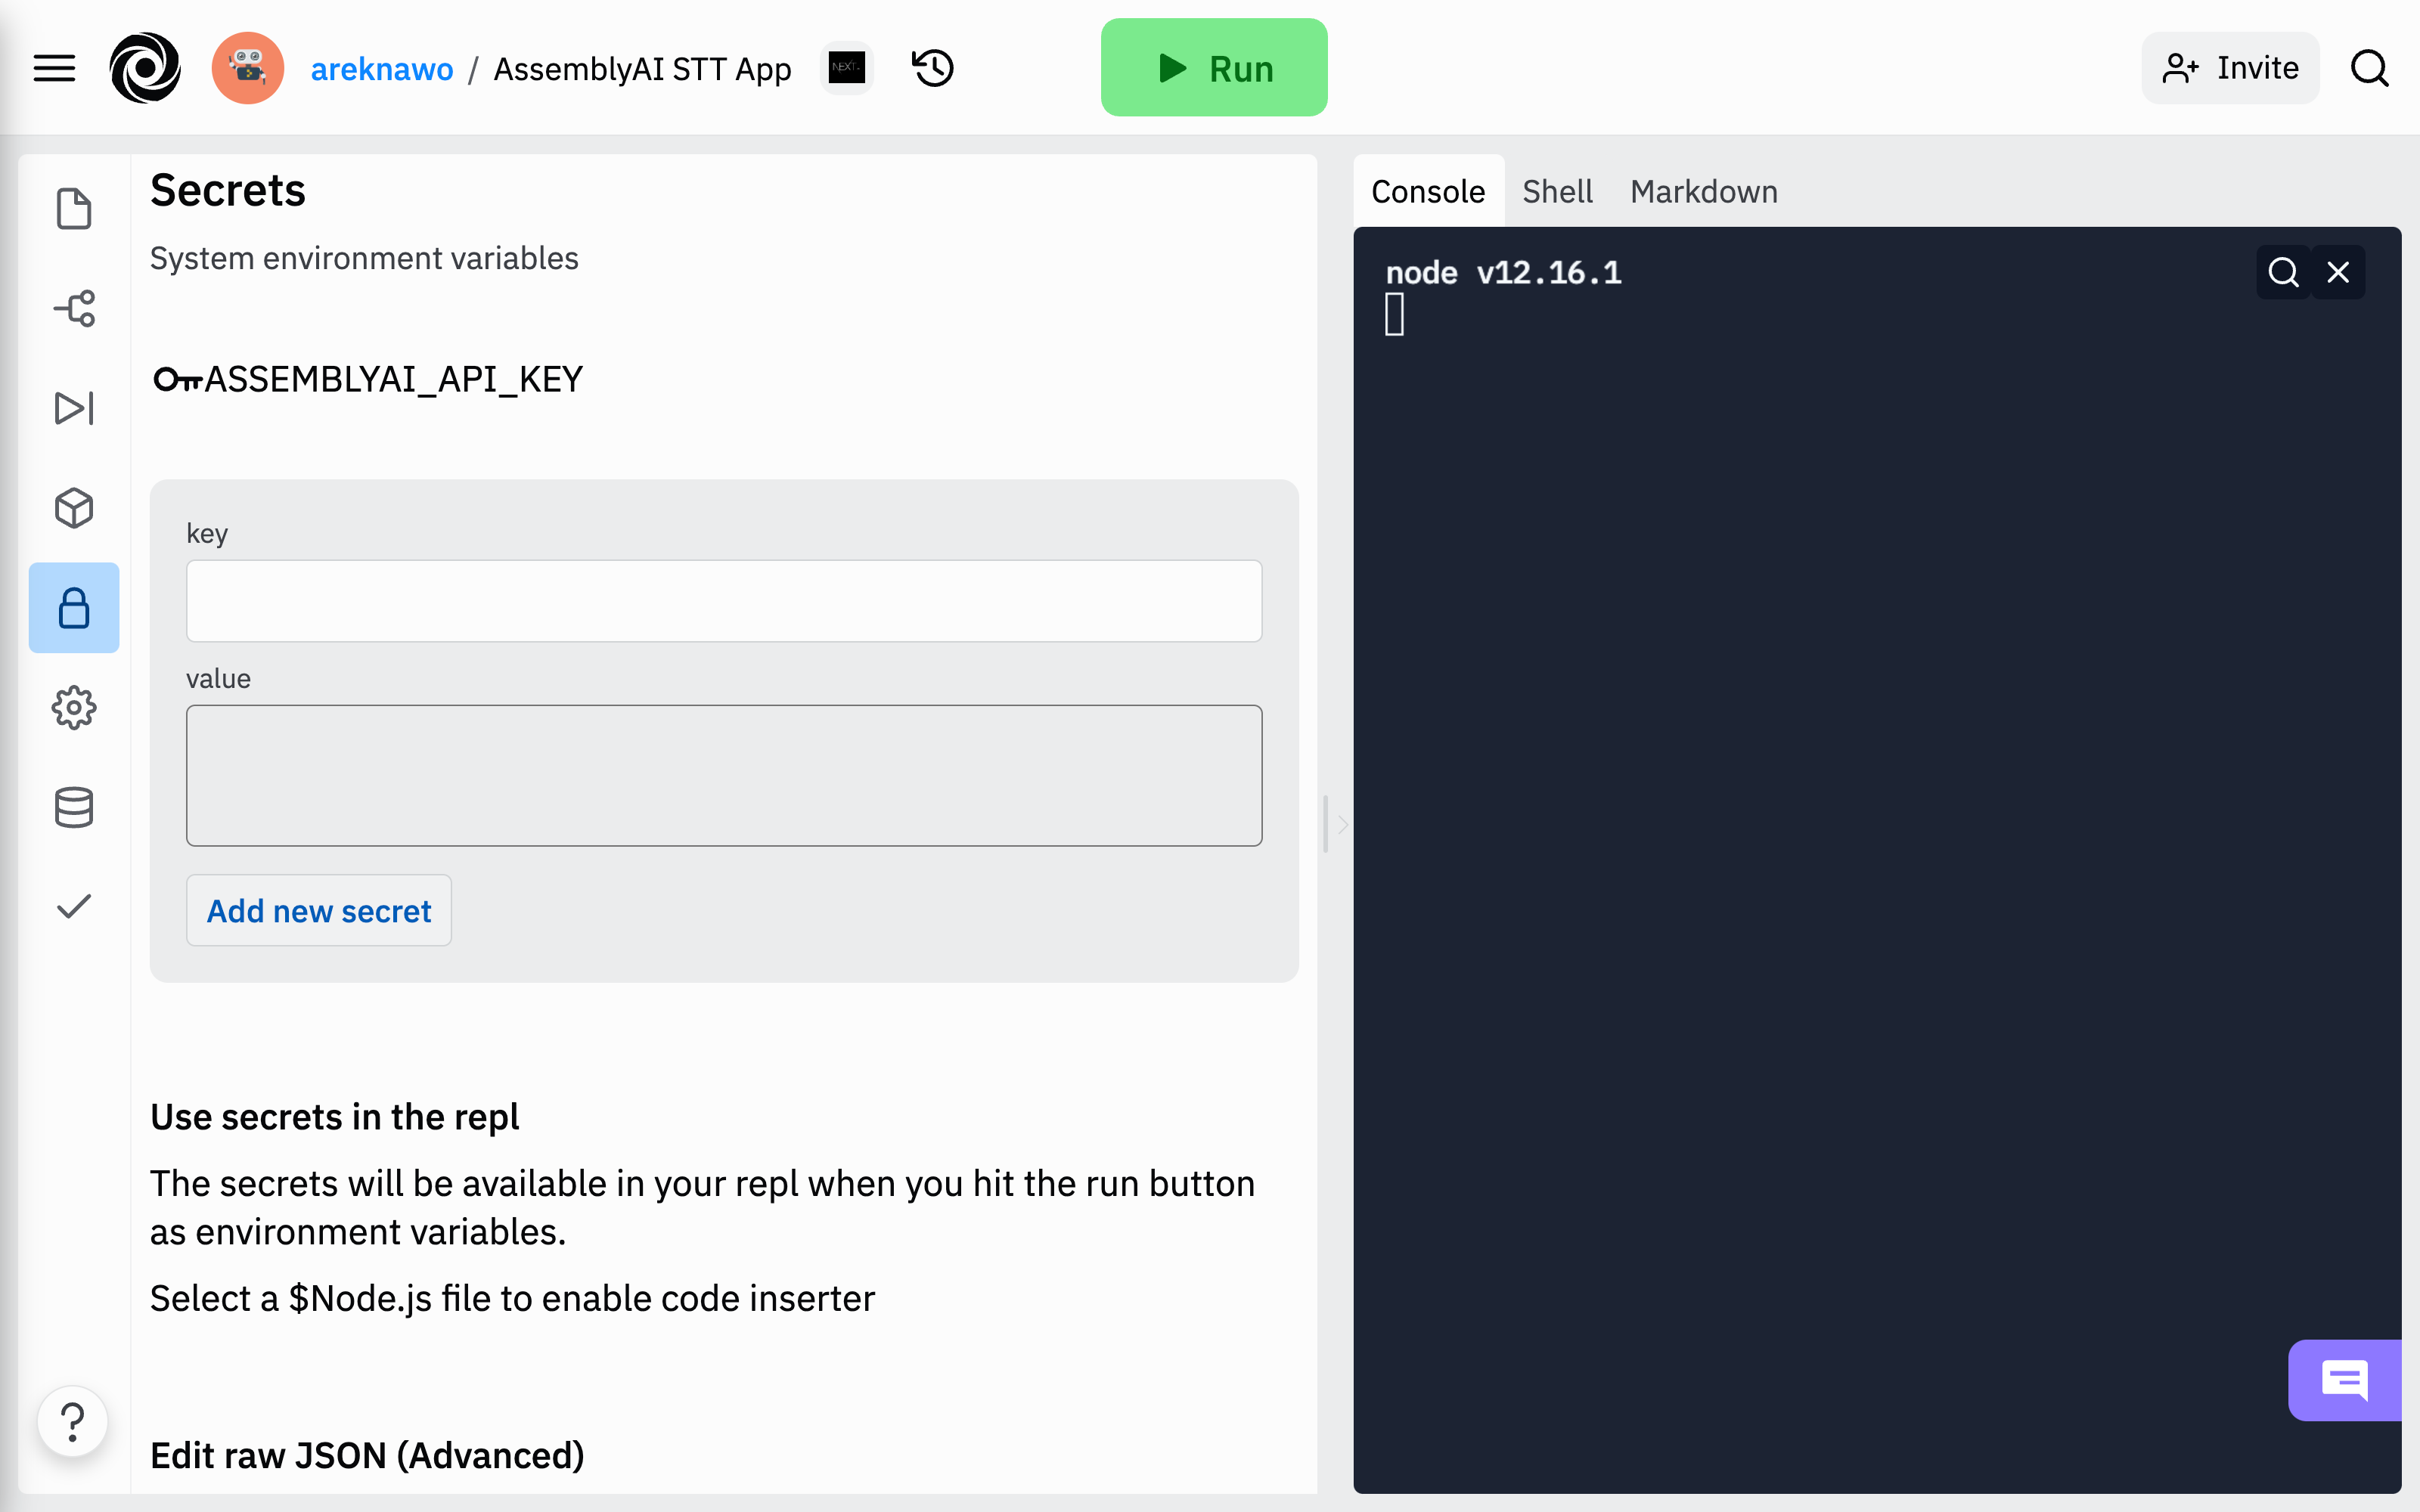
To authenticate with the API, you’ll need an AssemblyAI account and a copy of your API key from the dashboard. AssemblyAI provides three hours of audio transcription and a limit of five concurrent transcriptions at any given moment for free, which should be sufficient for this demo app.

To ensure the safety of your API key, place it inside the Secrets (environment variables) menu in your repl. It’ll then be easily accessible from API routes under the process.env object. For this example, use ASSEMBLYAI_API_KEY as the variable name.
Uploading Audio Files
With the key in place, you can now create the first API route: pages/api/upload.js. This route will be responsible for storing the audio file from the frontend and making it available to the AssemblyAI API.
Here, you’ll have to use the multiparty library to parse the request. For that, consider creating a helper function.
import multiparty from "multiparty";

const parseForm = (req) => {
  return new Promise((resolve, reject) => {
    const form = new multiparty.Form();

    form.parse(req, (error, fields, files) => {
      if (error) {
        reject(error);
      } else {
        resolve({ fields, files });
      }
    });
  });
};
The parseForm function uses multiparty to parse the multipart/form-data request and save incoming files. The result will be two lists of fields and files acquired from the form data.
To make proper use of parseForm, create a handler function where the whole request will be handled and responded to accordingly.
import axios from "axios";
import fs from "fs-extra";
// ...

const handler = async (req, res) => {
  const assembly = axios.create({
    baseURL: "https://api.assemblyai.com/v2",
    headers: {
      authorization: process.env.ASSEMBLYAI_API_KEY,
      "content-type": "application/json",
      "transfer-encoding": "chunked",
    },
  });
  try {
    const { files } = await parseForm(req);
    const file = await fs.readFile(files.data[0].path);
    const response = await assembly.post("/upload", file);

    res.status(200).json(response.data);
  } catch (error) {
    console.error(error);
  }
};

export const config = {
  api: {
    bodyParser: false
  },
}
export default handler;
While it’s not mandatory to use, AssemblyAI API provides a dedicated /upload endpoint to upload local files for transcription. While you can host the audio files yourself, this endpoint is a convenient and secure alternative.
To use the /upload endpoint, initialize the API request with proper headers, read the file to buffer, and send the request using the POST method. If the operation is successful, the API will respond with a private URL (available only to AssemblyAI servers) that points to your audio file and allows for its transcription down the line. For privacy reasons, the file will be automatically removed from the servers as soon as it’s transcribed.
Finally, export the handler function alongside a route config object. Setting Next.js’s built-in bodyParser is necessary in order for multiparty to work correctly.
Requesting Transcription
Now that you’ve got the audio file URL ready, you can make a transcription request. For that, create a new API route at pages/api/transcribe.js.
import axios from "axios";

const handler = async (req, res) => {
  const assembly = axios.create({
    baseURL: "https://api.assemblyai.com/v2",
    headers: {
      authorization: process.env.ASSEMBLYAI_API_KEY,
      "content-type": "application/json",
    },
  });

  try {
    const response = await assembly.post("/transcript", {
      audio_url: req.body.data.url,
    });

    res.status(200).json(response.data);
  } catch (error) {
    console.error(error);
  }
};

export default handler;
This handler wraps a POST request to the /transcript endpoint. The request body should be a JSON object with the audio_url property pointing to the audio file URL.
Now that the transcription request is submitted, AssemblyAI will begin processing it. To access the results, you’ll have to use another endpoint.
Accessing Transcription Result
Sending a GET request to AssemblyAI’s /transcript/:id endpoint will return details of the transcription and the current status of its processing. To ensure that the transcription is completed, you’ll have to make repeated requests to the endpoint. When the status property of response JSON is completed or error, it means that the transcription has been processed. In the case of an error, you’ll be able to learn more about it from JSON’s error property.
To use the endpoint, create the following API route in pages/api/result.js:
const axios = require("axios");

const handler = async (req, res) => {
    const assembly = axios.create({
        baseURL: "https://api.assemblyai.com/v2",
        headers: {
            authorization: process.env.ASSEMBLYAI_API_KEY,
            "content-type": "application/json",
        },
    });

    try {
        const response = await assembly.get(`/transcript/${req.body.data.id}`);

        res.status(200).json(response.data);
    } catch (error) {
        console.error(error)
    }
}

export default handler;
Requests to this API route will be made in a loop from the frontend, passing the ID acquired from the original transcription request.
Building the Frontend
With backend API routes ready, it’s time to build the frontend. For this example, the UI will be simple, consisting only of a file selector, action button, and output zone. The entire app will fit inside pages/index.js.
Start by creating the UI and functional structure of the app.
import Head from "next/head";
import { useState } from "react";
import clsx from "clsx";

const wait = (time) => {
  return new Promise((resolve) => {
    setTimeout(resolve, time);
  });
};
const upload = async (file) => {
  // ...
};
const transcribe = async (url) => {
  // ...
};
const Loader = () => {
  // ...
};
const App = () => {
  const [file, setFile] = useState();
  const [status, setStatus] = useState("");
  const [transcription, setTranscription] = useState("");
  const [error, setError] = useState("");
  const handleInput = async (event) => {
    // ...
  };
  const handleTranscription = async () => {
    // ...
  };

  return (
    <div className="w-full h-full flex justify-center">
      <Head>
        <title>AssemblyAI STT App</title>
        <meta name="description" content="AssemblyAI Speech To Text App" />
        <link rel="icon" href="/favicon.ico" />
      </Head>
      <div className="w-full max-w-lg p-2">
        <label className="flex flex-col items-center text-white rounded-lg p-2 bg-blue-500 hover:bg-blue-600 cursor-pointer transition-colors duration-150">
          <span className="text-base leading-normal">
            Select a {file ? "different" : ""} file
          </span>
          <input type="file" className="hidden" onInput={handleInput} />
        </label>
        <button
          className="rounded-lg border-2 p-2 w-full mt-2 hover:bg-gray-100 transition-colors duration-150 disabled:opacity-40"
          disabled={!file}
          onClick={handleTranscription}
        >
          Transcribe
        </button>
        {file && (
          <div
            className={clsx(
              "rounded-lg border-2 mt-2 p-2",
              error && "border-red-500"
            )}
          >
            {transcription && !error ? (
              transcription
            ) : (
              <div className="w-full flex justify-center">
                {status && !error && (
                  <>
                    <Loader />
                    <span className="ml-2 capitalize">{status}...</span>
                  </>
                )}
                {error && <span className="text-red-500">{error}</span>}
                {!status &&
                  !error &&
                  `File "${file.name}" ready for transcription`}
              </div>
            )}
          </div>
        )}
      </div>
    </div>
  );
};

export default App;
The upload and transcribe functions contain the extracted logic for interacting with the API, while the Loader component is a basic SVG spinner circle:
// ...
const Loader = () => {
  return (
    <svg
      className="animate-spin h-6 w-6 text-black"
      xmlns="http://www.w3.org/2000/svg"
      fill="none"
      viewBox="0 0 24 24"
    >
      <circle
        className="opacity-25"
        cx="12"
        cy="12"
        r="10"
        stroke="currentColor"
        strokeWidth="4"
      ></circle>
      <path
        className="opacity-75"
        fill="currentColor"
        d="M4 12a8 8 0 018-8V0C5.373 0 0 5.373 0 12h4zm2 5.291A7.962 7.962 0 014 12H0c0 3.042 1.135 5.824 3 7.938l3-2.647z"
      ></path>
    </svg>
  );
};
// ...
The handleInput function will be triggered on every file input change. It’ll start/restart the whole process, resetting the state and saving the file reference.
// ...
const handleInput = async (event) => {
  setFile(event.target.files[0]);
  setTranscription("");
  setError("");
  setStatus("");
  event.target.value = null;
};
// ...
Finally, handleTranscription is triggered when the user decides to transcribe the selected file. It handles updating the progress status and displaying errors if any appear.
// ...
const handleTranscription = async () => {
  try {
    setStatus("uploading");
    const url = await upload(file);
    setStatus("transcribing");
    const data = await transcribe(url);
    setTranscription(data.text);
    setStatus("");
  } catch (error) {
    console.error(error);
    setError(error.message);
  }
};
// ...
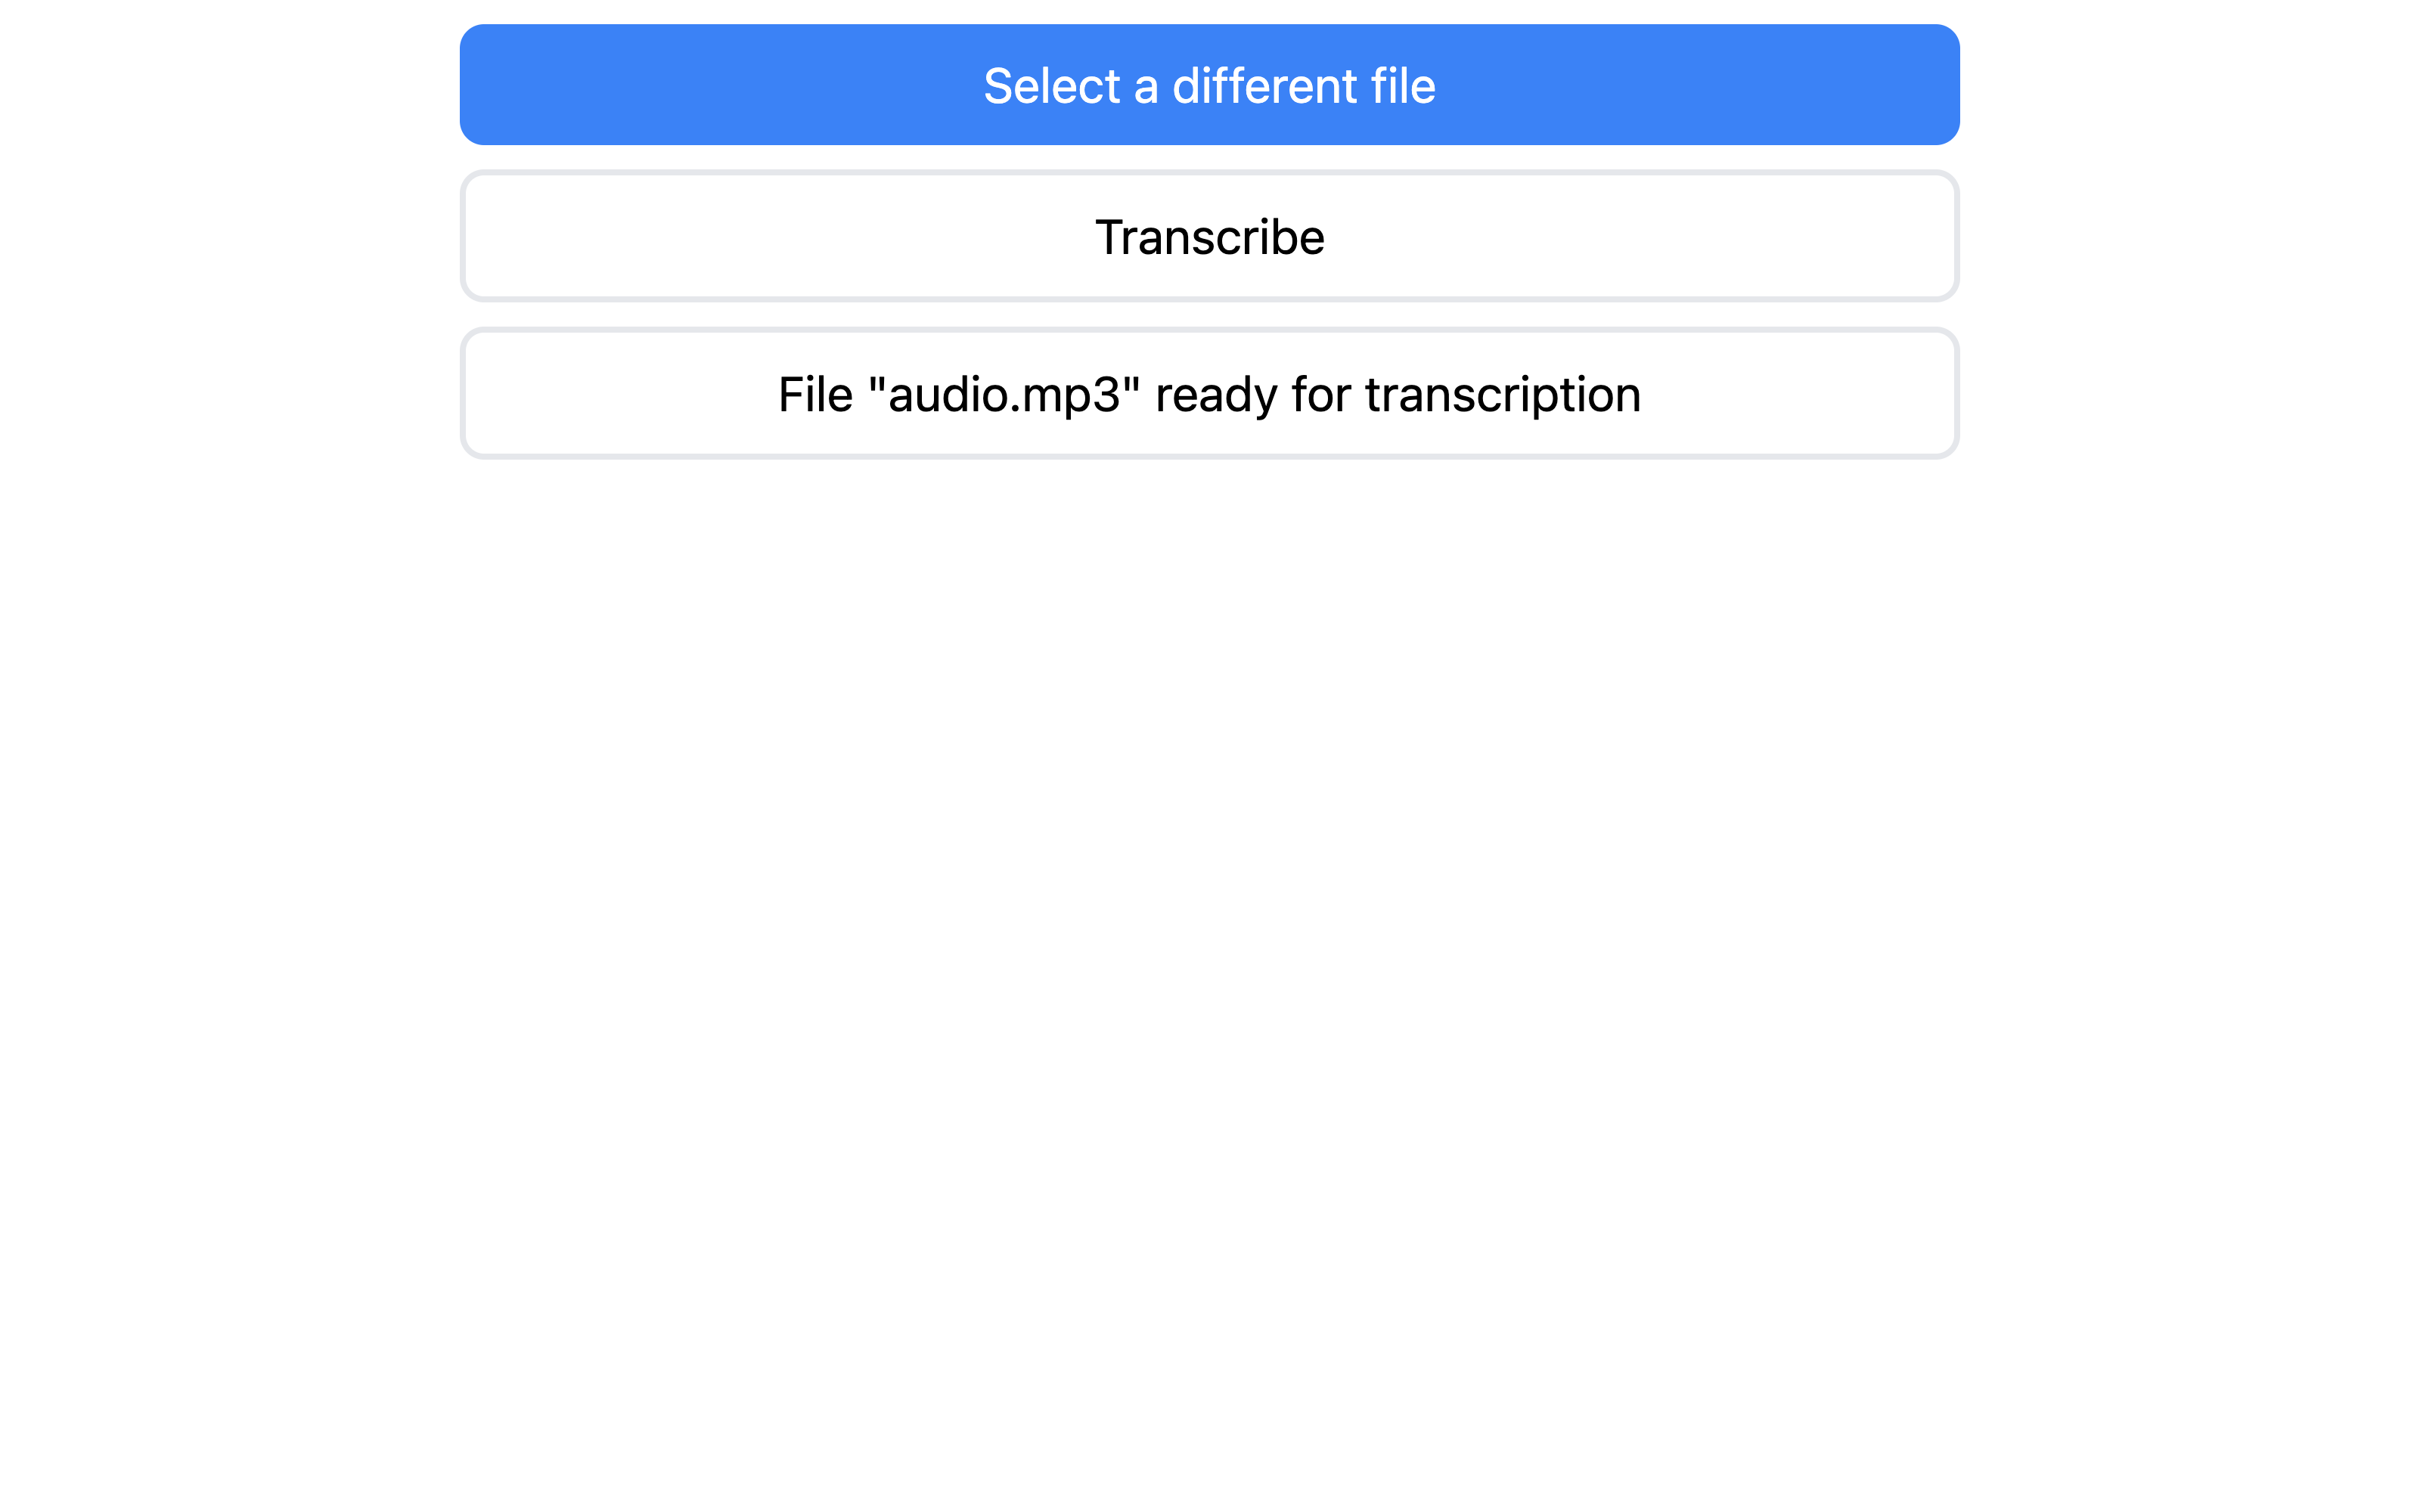
The UI should now look like this:
Connecting with the Backend
You still have to connect the frontend with the backend to make the app fully operational. Start by implementing the upload function:
import axios from "axios";
// ...

const upload = async (file) => {
  const formData = new FormData();

  formData.append("data", file);

  const response = await axios.post("/api/upload", formData, {
    headers: {
      "Content-Type": "multipart/form-data",
    },
  });

  return response.data.upload_url;
};
// ...
The function uses Axios to make a POST request to the /upload API route, with multipart/form-data content containing the selected audio file. In the end, the private audio file URL from AssemblyAI API is returned.
You can then pass on this URL to the transcribe function, which uses it to initialize and get the transcription results.
// ...
const transcribe = async (url) => {
  const response = await axios.post("/api/transcribe", { data: { url } });
  const id = response.data.id;

  let data = response.data;

  while (data.status !== "completed" && data.status !== "error") {
    await wait(1000);
    const response = await axios.post("/api/result", { data: { id } });

    data = response.data;
  }

  return data;
};
// ...
Requests to the /result API route are sent in a loop with a minimum of one second between each request. If the status property is completed or error, the function returns the transcription data. In the case of an error, details are available under the error property.
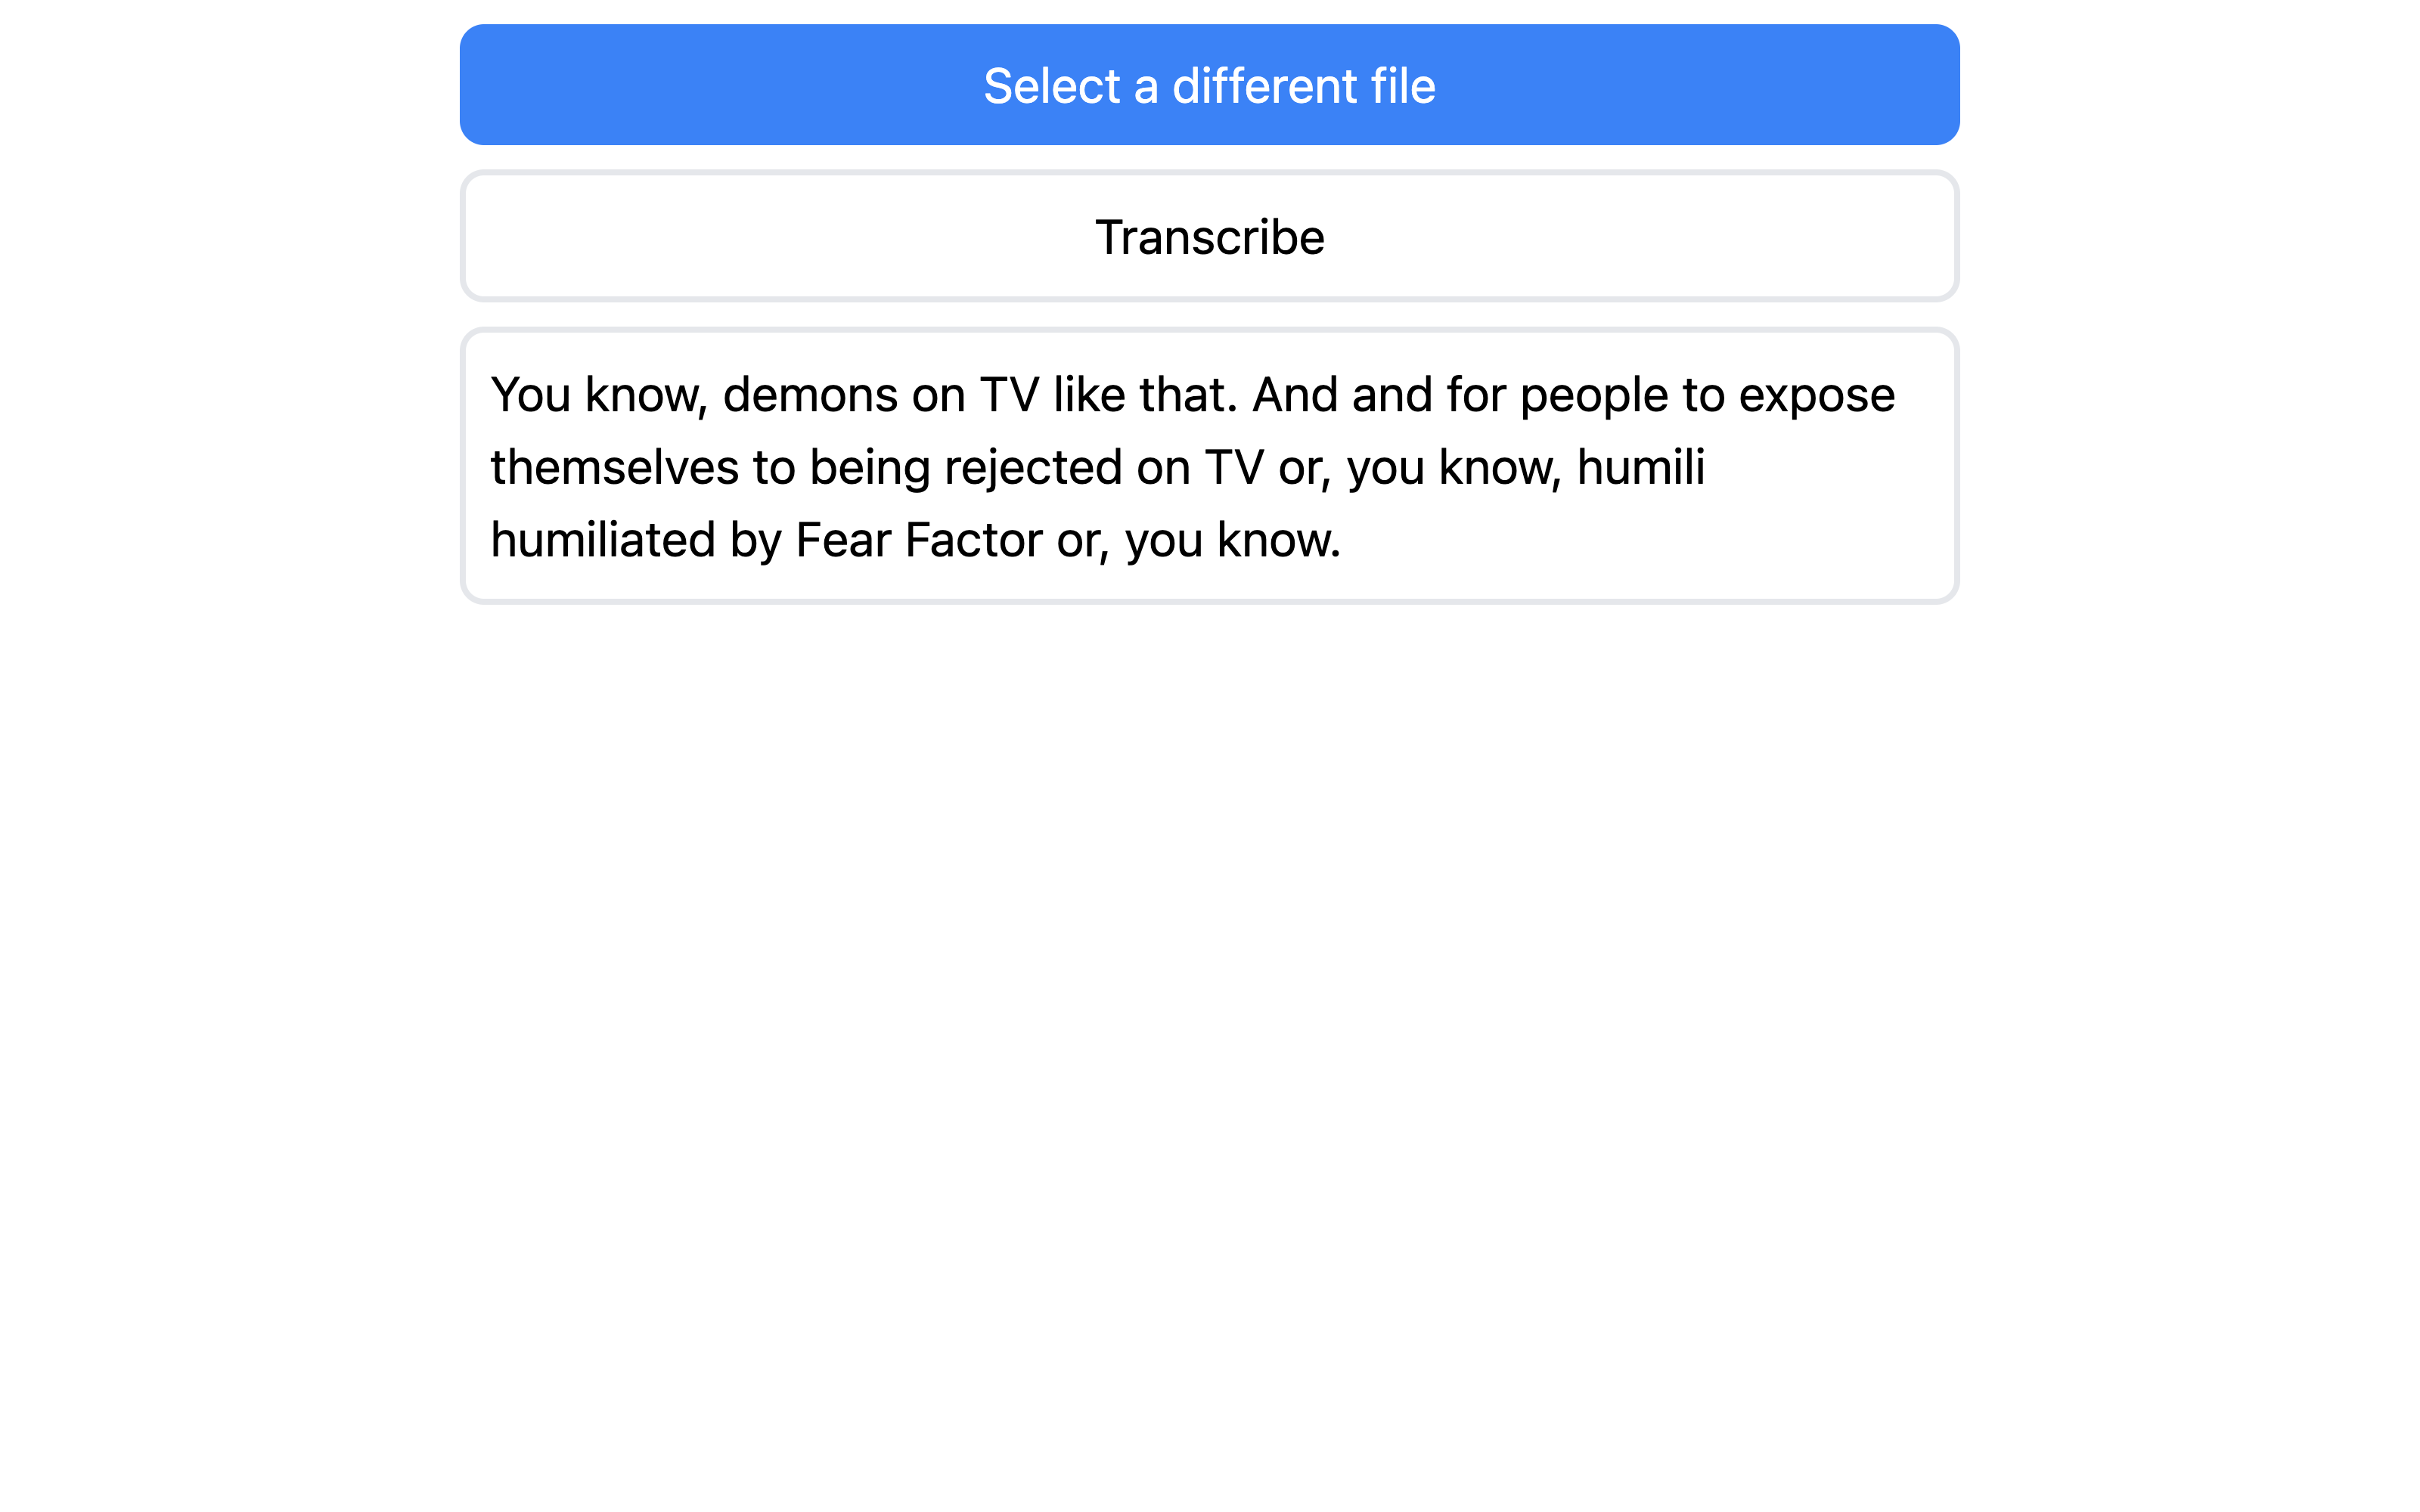
The final result should look like this:
Again, you can check it out live using this repl.
Conclusion
In this article, you’ve learned how to use the AssemblyAI API. You’ve learned how to integrate it with frameworks, like Next.js and React, and you’ve created a working app that can transcribe all kinds of audio files. As you might suspect, this is just the tip of the iceberg, as AssemblyAI provides many more features—like real-time transcription and audio intelligence—that you can use to build various complex apps.
This whole app has been implemented in the cloud using the Replit online IDE. Replit can help you build all sorts of applications, including speech-to-text apps, while encouraging you to code for fun and explore the unknown.